
How to Automate Sending Dynamic Emails from PowerBI Reports


TL;DR
This article presents two methods for achieving this: using Python for dynamic email reports and leveraging Locale for a no-code automation approach.
Method #1: Using Python for Dynamic Email Reports:
- Utilize Power BI's REST API to programmatically access the datasets.
- Extract data using Python's requests library and process it.
- Generate email content dynamically using Python's email libraries.
- Schedule the email delivery using cron or Task Scheduler.
Method #2: Automate dynamic reports through Locale.ai:
- Connect the database, and write the SQL query to set up the alert condition.
- Set the alert frequency and recipients for email notifications.
- Locale will automatically run it and send emails based on the defined schedule.
The Python method offers requires significant setup and maintenance. In contrast, with Locale.ai you don’t need PowerBI, it provides a no-code automation approach that simplifies the process, making it ideal for users seeking a hassle-free solution without complex scripting and maintenance tasks.
In today's data-driven world, the ability to effectively communicate insights is as crucial as the insights themselves. Power BI, a leading business analytics tool, enables organizations to visualize their data and share insights across the enterprise or embed them in an app or website. However, a common challenge arises when it comes to dynamically distributing these insights via email, tailored to the specific needs and contexts of different stakeholders.
Imagine a scenario where a Power BI dataset, created using PostgreSQL, holds key business metrics that are critical for various departments. The goal is to send customized email reports based on this dataset, ensuring that each department receives relevant, up-to-date information that aids in decision-making. This process, while seemingly straightforward, can become cumbersome and time-consuming without the right tools and methods.
In this detailed guide, we’ll walk you through how you can automate sending dynamic emails from the PowerBI report
- Method #1: Using Python for Dynamic Email Reports
- Method #2: Automate with No-Code Automation through Locale
Method #1: Using Python for Dynamic Email Reports
Before extracting data from Power BI, you need to determine the correct API endpoint. Power BI’s REST API provides service endpoints for interacting with different aspects of the Power BI service, including datasets, reports, and more.
1. Access Power BI Service:
Log in to your Power BI account and navigate to the workspace where your dataset is located.
2. Identify the Dataset:
Locate the dataset you wish to use for your report. Each dataset in Power BI has a unique identifier.
3. Find the API URL:
- In Power BI, go to your dataset's ‘Settings' or 'Advanced Settings’.
- Look for the API information or integration settings. You should find it. the API URL or endpoint specific to your dataset.
- The typical format of a Power BI API URL for datasets is:
https://api.powerbi.com/v1.0/myorg/datasets/{dataset_id}
4. Extracting Data from Power BI:
- Utilize Power BI’s REST API to access the datasets programmatically.
- Use the Python requests library to make API calls and retrieve the necessary data.
- Example Python code snippet:
5. Processing and Formatting the Data:
- Once the data is retrieved, use Python’s data manipulation libraries like Pandas to process and format the data.
- This step involves filtering, sorting, and structuring the data as per the requirements of different departments.
- Example Python code snippet:
6. Generating Email Content:
- Use Python’s email libraries, such as smtplib and email.mime, to create and format the email content.
- You can dynamically generate the email body, subject, and even attach reports as needed.
- Example Python code snippet:
7. Scheduling the Email Delivery:
- To automate the process, use a scheduling tool like cron on Linux or Task Scheduler on Windows to run the Python script at specified intervals.
- This ensures that the reports are sent out regularly without manual intervention.
While this method provides a high degree of customization and control, it requires significant setup and maintenance. Managing API integrations, handling data securely, ensuring the reliability of the scripts, and updating the system for any changes in the dataset or the Power BI API can be complex and resource-intensive.
Method #2: Automate with No-Code Automation through Locale
Locale, no-code platform handles the heavy lifting, providing a maintenance-free, reliable, and user-friendly experience. With just a few clicks, you can automate sending SQL query results to email.
Step 1: Log in to Locale, Go to Org Setting, and Connect your database from the data source.
Step 2: Now go to Alerts → Create New Alerts. Choose your database → Click on Setup data to be monitored.

Step 3: Write your own SQL Query and click Run to verify the data. Once you are satisfied, click Done.

💡 Write the same SQL query you use in the dataset for PowerBI reports
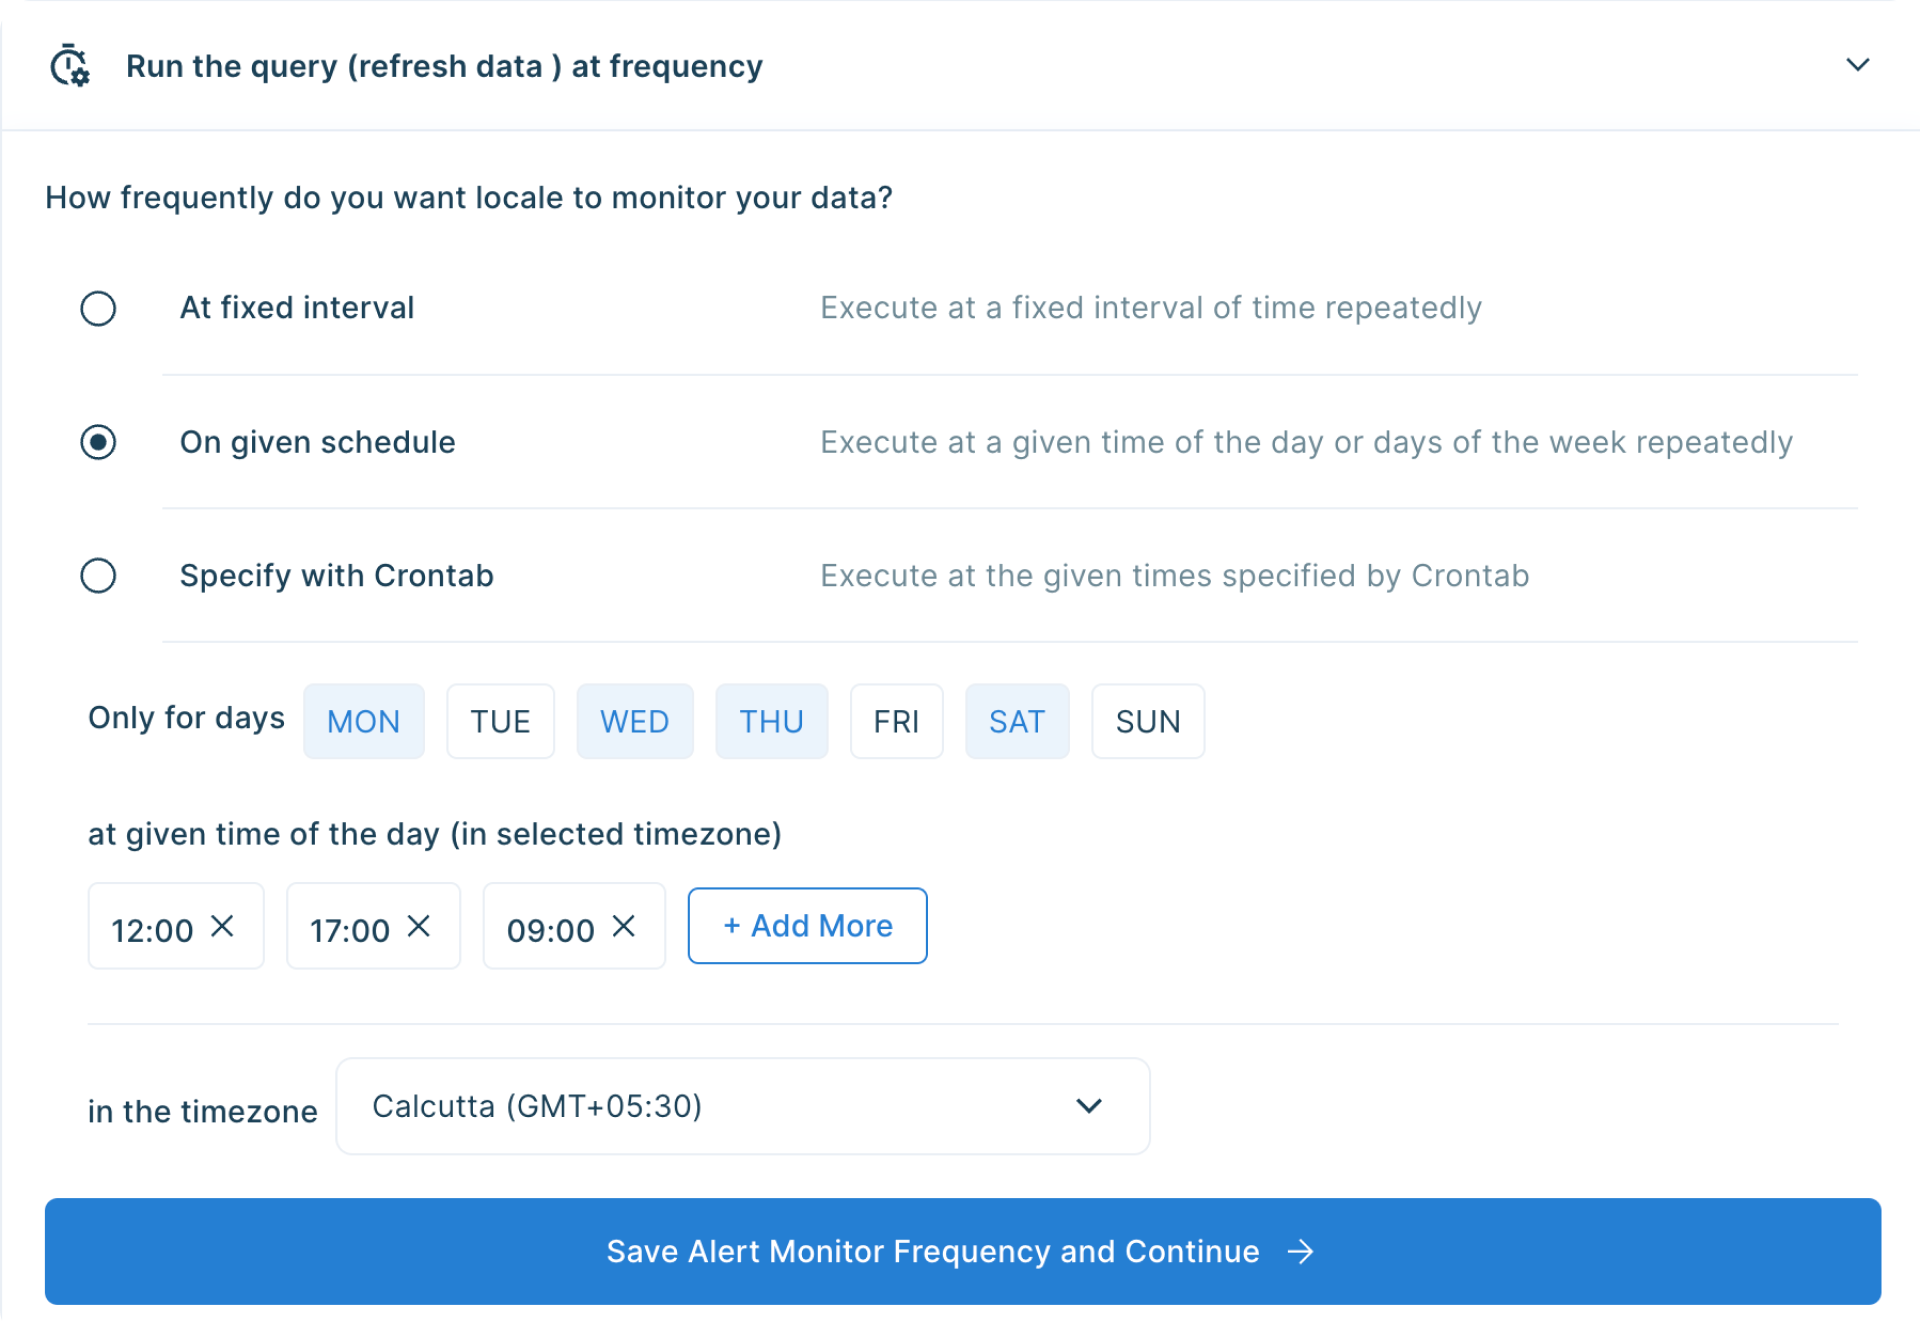
Step 4: Now Set Alert Frequency, this will automatically run the query and send an email based on the frequency you set.
Step 5: Final Step, you can set up whom the email should be sent. You can click on Add Notification/action from the Setup Notification/Action section. Now click on Email Subscribers and add all the email addresses to whom you want to send emails.

💡 You can dynamically send emails based on query results by selecting the email field from { } icon
Save the alert and it will automatically run itself and send emails.
Conclusion
Automate sending the PowerBI report dynamically to the right individual is essential to share insights across diverse organizational departments. In this blog, we explored two distinct methods. The first method involves leveraging Python for creating dynamic email reports. In this method users can customize and format information according to the unique requirements of each department. However, while this method provides a high level of customization, it demands significant setup, maintenance, and considerations for security and reliability.
On the other hand, the second method introduces a no-code automation approach through Locale allowing users to automate sending SQL query results via email. With a simple setup that includes connecting the database, creating alerts with SQL queries, and defining alert frequencies and recipients, Locale offers a maintenance-free and reliable solution. This method is particularly advantageous for those seeking a hassle-free approach without delving into complex scripting and maintenance tasks.
Excited to get started? Secure early access – speak with us.

